- A Comprehensive Step-By-Step Tutorial On How to Set Up & Manage Google Ads For Your Med Spa or Practice
- Step #1: Select Services to Promote That Set You Up For Success
- Step #2: Make a Compelling Case That Patients Should Choose YOU Over Your Competition
- Step #3: Build a Landing Page That Converts!
- Step #4: Setting Up Your Ad Campaign
- Step #5: Build a Keyword List That is Specific and Targeted
- Step #6: Build Your Ads (Responsive Search Ads)
- Step #7: Build Out Ad Extensions
- Step #8: Make Sure You’re Tracking Your Conversions (Leads)
- Step #9: Managing & Optimizing Your Campaign Performance
A Comprehensive Step-By-Step Tutorial On How to Set Up & Manage Google Ads For Your Med Spa or Practice
This guide is accompanied by a FREE video series that walks you through the following steps in even more detail here –> https://youtube.com/playlist?list=PL7C-z6-JemomPKTTTD7Ki9Av0jO4s07Xo
Step #1: Select Services to Promote That Set You Up For Success
The first thing you need to do when launching Google Ads for your practice is to select services that set you up for success. That means promoting services that meet the following criteria;
- Google Ads policies don’t restrict your ability to advertise the service
- The service is known (people already know about it and are actively searching for it)
Step #2: Make a Compelling Case That Patients Should Choose YOU Over Your Competition
Your competitors likely also offer the same services you provide. Here’s the truth: Unless you have a super unique approach, technique or solution, you need to be willing to discount your services for the first visit.
Med spas (and most local, service oriented businesses in general) operate within what I call the Visible & Viable Model. This means that you need potential customers to know that you exist (visible) and you need to have a good reputation and track record of success (demonstrating that you’re a viable option to provide services).
So, when you’re showing up via the Google Ads space, you’re checking that first box of visibility. Then, when users click your ad and visit your website/landing page, you need to demonstrate viability (social proof and reputation info), then you need to sweeten the offer by providing a limited time special discount. THIS is the base of our recipe for Google Ad success.
Don’t worry about making a bunch of money on the first visit, you need to focus on lifetime value. In the words of Adam Ferrier, action changes attitude faster than attitude changes action. This means getting patients into your office to have a genuine, personal, positive experience with your staff. Patients who have a positive experience and build a favorable view of your practice are those most likely to visit consistently and to explore other services you offer!
Step #3: Build a Landing Page That Converts!
Once users perform a search for your services and clicks on your ad, they’ll be directed to a webpage of your choosing. Here is how we build landing pages that convince and convert visitors into leads…
- Make sure your landing page has a clear call to action at the top section of the page
- Offer a “virtual coupon” download in exchange for them filling out a form with their name, email and phone number
- Be clear with what happens next (ie. “After filling out this form, we’ll email you the virtual coupon voucher along with info on how to book your appointment”)
- Highlight the key benefits of the service (remind them of the outcome this service will provide and the problem it will help solve)
- Provide social proof (include review ratings, features, certifications, awards etc. that position you as a viable option)
- Attempt to book the lead immediately after they download the offer voucher (book now links or prompts to call the office)
Here is an example: https://www.myleadpage.net/vein-centre-special
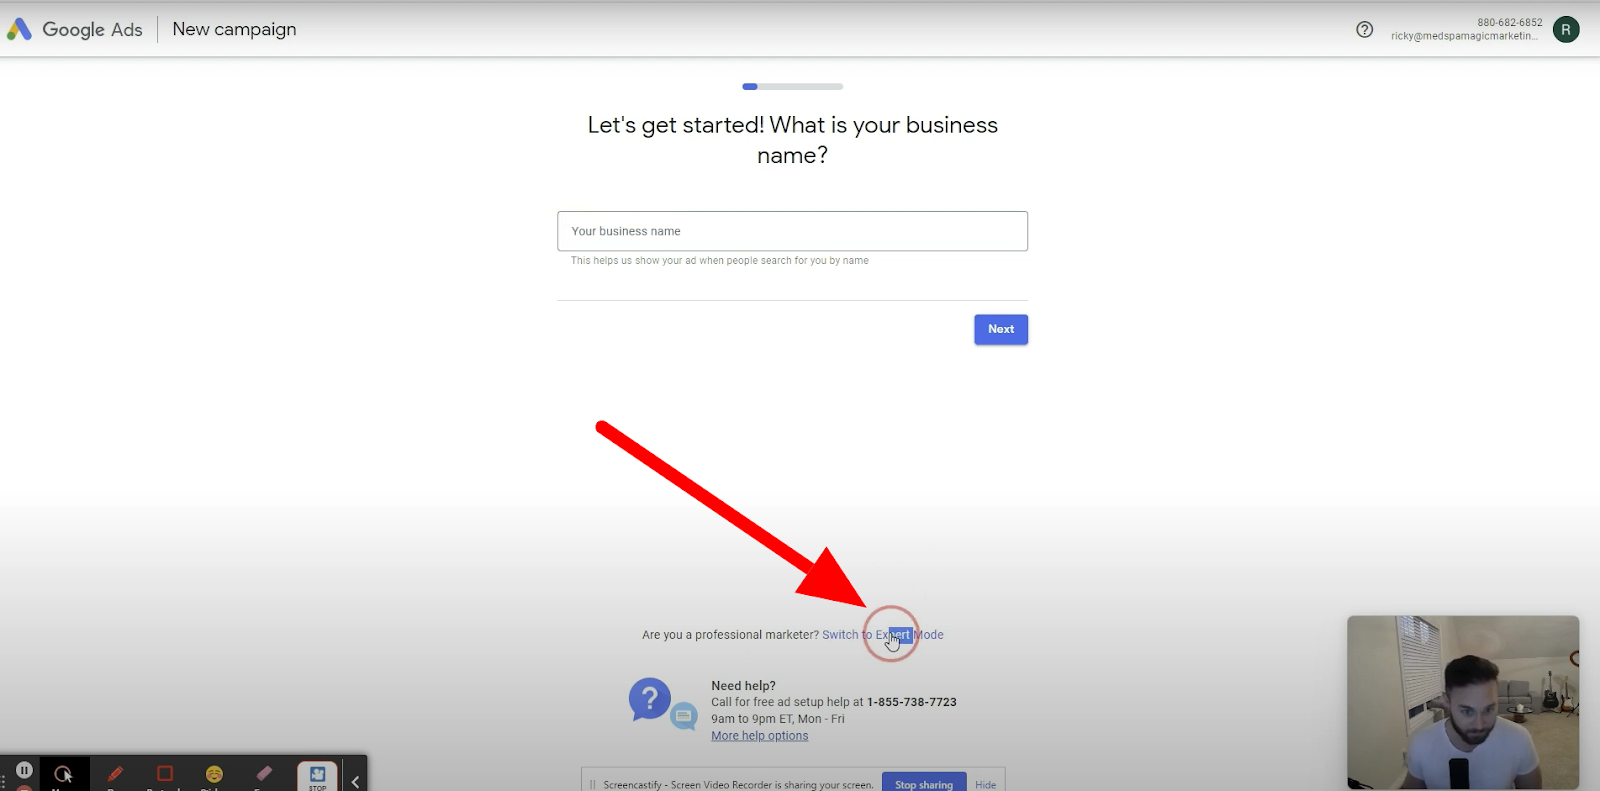
Step #4: Setting Up Your Ad Campaign
By default, Google will prompt you into setting up a campaign in “non-expert” mode. So, the first thing you’ll want to do is to select “expert mode” at the bottom of the setup page. This gives us maximum control over the campaign setup.
Then,
- Select “Leads” as the campaign objective.
- Select “form submissions” and “phone calls.”
- Select “Search” as the campaign type
- Name your campaign (ie “ Botox Leads”)
- Change the Ad Schedule if you only want phone calls during office hours
- Deselect “United States” from Locations and select “Enter another location.”
- Click the blue text that says “Advanced search”
- Type in your office address and select an appropriate radius (keep it focused on the radius where 80% + of your customers will come from)
- Select your daily budget (the more you’re willing to spend, the more traffic and leads you’ll see…I suggest at least $500 per month to start)
- Save and Continue
Step #5: Build a Keyword List That is Specific and Targeted
- Use exact match keywords, in brackets (ie. [botox nashville])
- Use only keywords and phrases that indicate someone is specifically searching for the exact service you officer (ie. [coolsculpting nashville] instead of [fat loss nashville])
- Add as many keyword phrases that are super specific to the service as possible
- Include nearby cities if they are in your ideal target radius (within 5 miles or so from your office)
Step #6: Build Your Ads (Responsive Search Ads)
- Try to get your Ad strength rating to “Good” or better
- Add headlines that are specific to the service and city (ie. “Botox Provider in Downtown Milwaukee”)
- Add headlines that are specific to the offer (ie. “Get $100 Off Botox”)
- Add headlines that reference social proof (ie. “Rated Top Spa in Milwaukee 2022”)
- Pin headlines that are synonymous (if you add three different headlines that reference the discount, you can pin those in the same spot, for example)
- Add descriptions that position you and your offer as a great option vs. other listings that show up on the search results!
- Use the URL of your landing page (from Step #3) as the Final URL
- Enter your billing info
Step #7: Build Out Ad Extensions
- In the left gray sidebar of your Google Ads dashboard, find the “Ads & extensions” dropdown
- Click on “Extensions”
- Extensions you’ll want to add are…
- Callout extensions – add short snippets of text to beef up your ad (ie “Free Consults”, “See Our Reviews”, etc.)
- Structured snippets – browse the header list to see if any existing options are applicable to your ad campaign
- Promotion extensions – highlight the offer info!
- Call extensions – Show your phone number directly on the ad, if applicable
Step #8: Make Sure You’re Tracking Your Conversions (Leads)
In order to effectively optimize and manage your campaigns, you’ll need to know which ads, keywords etc. are generating the best results. To track conversions, click “Tools and Settings” at the top of your screen and select “Conversions.”
Follow the prompts to implement the tracking codes, send those to your web person OR hire a freelancer (less than $100) off of Upwork to implement tracking.
Step #9: Managing & Optimizing Your Campaign Performance
After your campaigns are live, you’ll want to keep an eye on which aspects of your ads, keyword list etc. are converting leads and which aren’t. To do that, we’ll test and fine tune a few different items…
- Test different ads
- Experiment with groupings and headlines
- Try ads with pinned headlines vs. unpinned headlines
- Experiment with ad descriptions
- Test landing page elements
- Headlines on your page
- Graphics used on the page
- Color schemes and color placement
- Call to action language
- Test your offer
- Can you provide a more enticing offer? Experiment with the deal you’re promoting!
- Review and clean your search terms report
- This is THE most important part of campaign optimization. As data rolls in, you can see the exact search queries that are generating clicks to your ad. You can find the search terms report under the “Keywords” tab in gray.
- When you see search terms that aren’t a perfect fit, select those and add them as negative keywords.
That’s it! Following this guide will ensure you have a fine-tuned, well optimized Google Ads campaign in place that is sure to generate a consistent flow of leads to your spa or practice.